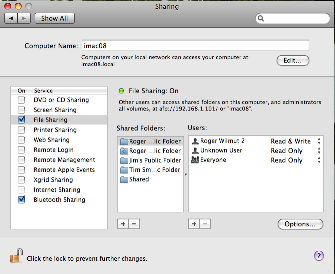
 1. Open System
Preferences>Sharing (let's call this machine 'computer 1').
2. Give the computer a name in the field at the top.
3. In the list on the left, click the checkbox for 'File sharing' (or
'Personal file sharing').
4.
If there is a list of 'Shared Folders' (Leopard/Snow Leopard) you
should see the
Public Folder listed. (It's possible to share any folder by dragging it
into the list).
5. Click the 'Start' button (Tiger); in Leopard/Snow Leopard check the
File Sharing:
on radio button is on.
6. You must repeat this process (1-6) with every other computer on the
network.
7.
In the Sharing pane of the machine you want to connect to ('computer
2') you will see, below the computer name the message 'Other computers
on your local subnet can connect to your computer at afp://(IP number)
or computername.local'. Make a note of this.
 8. Now in the Finder
menubar, choose Go then 'Network'. You
will see a list of connected computers: double-click on computer 2; in
the window which opens (right) you will see a list of the users, from
which you can only select the Drop Box; to log in to your account click
the 'Connect As...' button at top right.
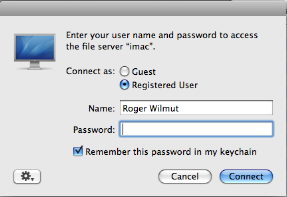
9. The pane which opens (below) is also accessible from the 'Connect to
server'
window of the 'computer 1' - in the top
field, 'Server address') type
afp://computername.local (from computer 2) and hit the 'Connect' button
.
 10.Enter your
username and password.
The icon for your account on computer 2 should mount on the desktop.
You cannot access other
people's accounts except for the Public Folder, the Drop Box and any
folders they have designated as shared.
11. Make an alias of the
icon for computer 2 and put it somewhere convenient. Now you can
double-click it to make connection easy in future.
12. You can eject computer 2 like any disk: drag to the trash or
highlight and command-e.
HOW TO SET UP FILE SHARING IN MAC OSX
©
Roger Wilmut. This site is not associated with Apple.

 Technical notes index